
Ceiling storage in a bedroom ranges from a $12 chain-and-hook set to full-wall built-ins with rolling ladders, and the only thing that should decide which you install is how often you will need to reach what you are storing. The catch is that every option fails the same way: a bracket that misses the joist or a net left to sag will dump your off-season clothes onto the bed at 2 a.m. A Fleximounts rack rated for 600 pounds means nothing if your bedroom ceiling is framed at 16 inches on center and the mounting holes land in empty drywall.
1. Open Shelves Under the Ceiling

Open shelves tucked tight against the ceiling draw the eye upward without closing off the room the way a full cabinet would. Pine or plywood boards, kept to eight or ten inches deep, hold books you rarely reach for, spare bedding in zippered bags, or the decorative objects that otherwise clutter the dresser. The gallery-wall effect comes from treating the shelf itself as a frame: leave breathing room between grouped items, and the wall reads as intentional rather than piled-up.
Floating brackets or concealed hardware keeps the look clean, but the real mistake is loading these like a closet rod. A shelf mounted that high is a pain to dust and an even bigger pain to re-anchor once it pulls free. I stick to lightweight items and check the brackets every spring, the same weekend I flip the mattress. The hardware costs a few dollars more than basic L-brackets, but the difference between "airy" and "clunky" is visible from the doorway.
2. Built-In Cabinets to the Ceiling
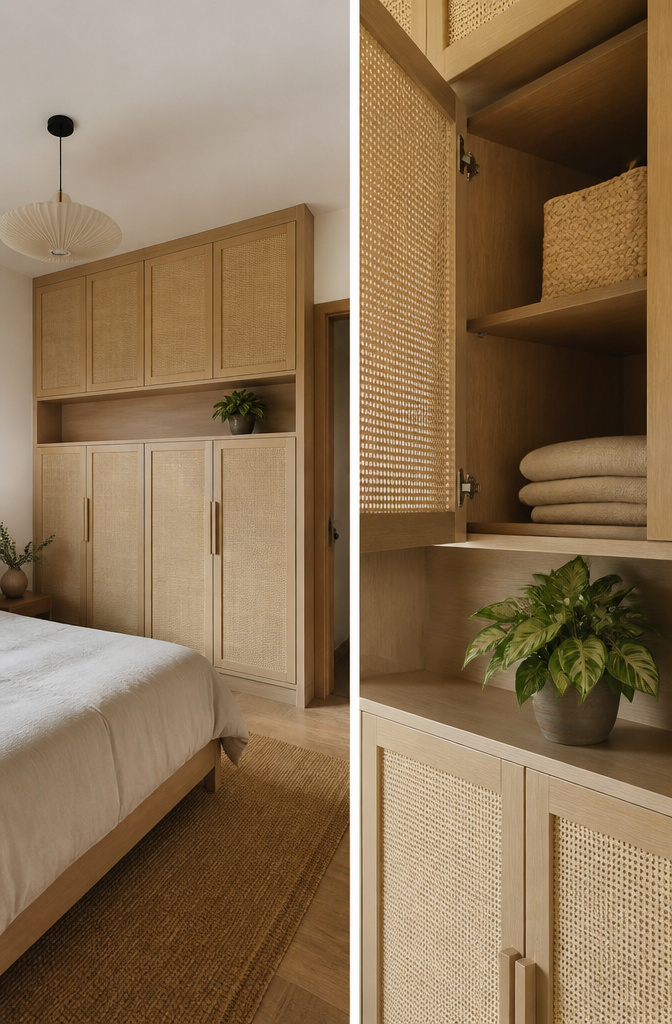
Built-in cabinets that reach the ceiling solve the problem of where to put the stuff you do not want to look at. Custom joinery lets the storage disappear into the wall itself, which matters in a bedroom where every visual break shrinks the room. In one small apartment I read about, a studio used wood and rattan panels across the full wall height so the cabinets read as architecture, not furniture. The material choice also held up: rattan resists moisture and needs little maintenance, a practical note if you are already fighting humidity in a tight space.
The full-height approach works especially well in apartments with high ceilings that otherwise waste vertical volume. One design left a deliberate gap between upper and lower cabinets, sized so the lower bank matched the door height and the upper bank needed a rolling ladder. That gap broke up what would have been a monolithic wall, and it gave the owners’ cat a perch. For a bedroom, the same gap could hold a display ledge or simply let the wall breathe.
Semi-custom lines can get you close to this look for less, but the finish match is where they usually slip. If the cabinet face does not read as the wall, you have just built a tall box. The extra cost of matching paint or veneer to existing trim pays back in square footage you do not feel.
3. Ceiling-Mounted Storage Racks
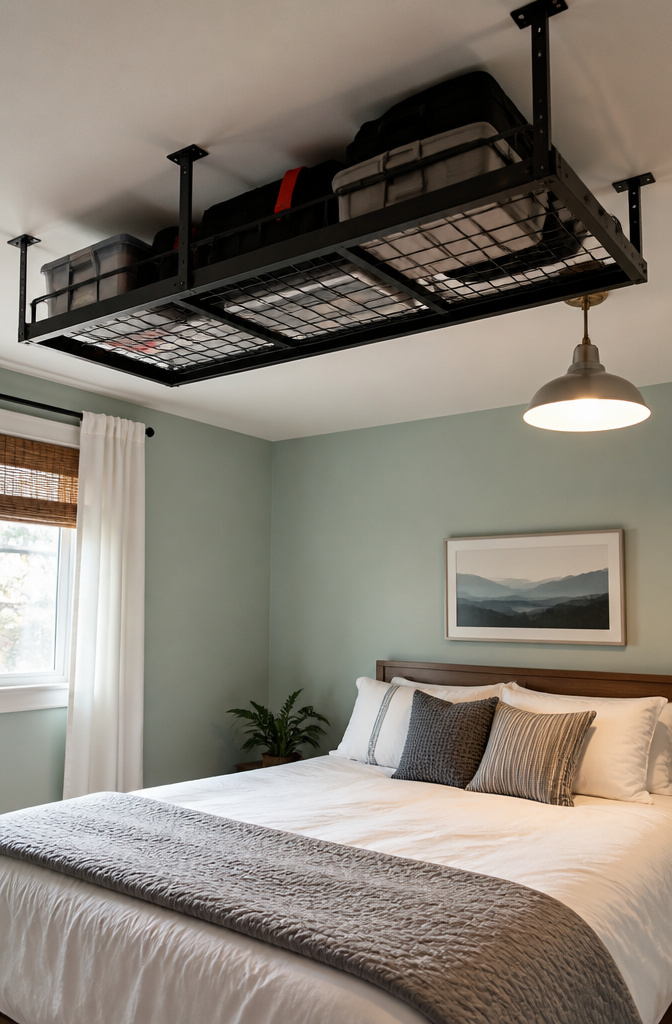
Garage-style overhead racks bolt straight to ceiling joists and carry loads that would collapse a closet rod. Fleximounts rates theirs at 600 pounds, which is the weight of a small motorcycle or roughly every winter coat and holiday bin a two-bedroom apartment accumulates. The hardware is gloriously overbuilt: steel angle, lag bolts, a powder coat that survives garage humidity.
The catch is spacing. These racks ship in four-foot widths because garage joists run on 24-inch or 48-inch centers. Bedroom ceilings are framed at 16 inches on center, which means the mounting holes land between joists unless you bridge across with a plank or track system. I have seen people skip that step and rely on drywall anchors. The drywall always wins, briefly, and then the rack wins, suddenly, at 2 a.m.
For seasonal storage, the height works in your favor. Bikes, ski bags, and the vacuum you never use sit above head height but below the light fixture. Installation takes a Saturday, a stud finder, and a willingness to work on a stepladder with a drill overhead. The real limit is access: anything you need monthly belongs somewhere friendlier.
4. Hanging Storage From Hooks and Chains

Ceiling hooks and chains are the fastest way to test whether overhead storage actually fits your routine. A few S-hooks on a length of chain will hold bags, belts, shoes, or accessories right where you can see them, and the whole setup costs less than a storage bin. For renters, this is usually the safest first move: a small hook hole patches with spackle in under ten minutes, and most landlords never flag it.
The mistake that turns this simple project into drywall regret is skipping the stud or joist search. I learned that the hard way in my first apartment, screwing a hook straight into what felt solid enough until a loaded tote pulled a fist-sized chunk free. Toggle bolts exist for exactly this gap, but they need a hole you will definitely have to patch later. For anything beyond a light scarf or empty purse, find the joist or use the toggle; guessing is not a third option.
Pre-made chain kits and industrial ceiling racks sit at opposite ends of the same idea. The racks run heavy and plain; the chains and nets stay light and out of sight. Most bedroom needs land closer to the chain end, and the money saved there buys better S-hooks that will not deform under a loaded leather bag.
If you’re going to use your ceiling for storage, make sure you are smart about placement.
That placement lesson applies double in a bedroom, where a chain hung too low means a forehead collision on the way to turn off the alarm. Keep the bottom of any hanging item above eye level for the tallest person in the house, and test the swing path before you load it up.
5. Corner Shelves for Awkward Spaces

Corner geometry is the one thing standard furniture gives up on, which is exactly why triangular shelves cut to fit can turn dead space into something you actually use. A pie-cut shelf follows the angle of the walls rather than pretending the corner isn’t there, and that shape happens to suit the kind of items bedrooms collect: a short stack of books, a small plant, the decorative object you don’t have surface space for elsewhere.
The mistake I see repeated is building these too deep. A corner shelf that extends two feet along each wall puts the back corner nearly three feet from the front edge. Keep the front edge within 14 to 16 inches of the corner, or you will need a step stool to reach what you stored. Shallow shelves in a corner are more useful than deep ones you avoid.
6. Vertical Storage Units
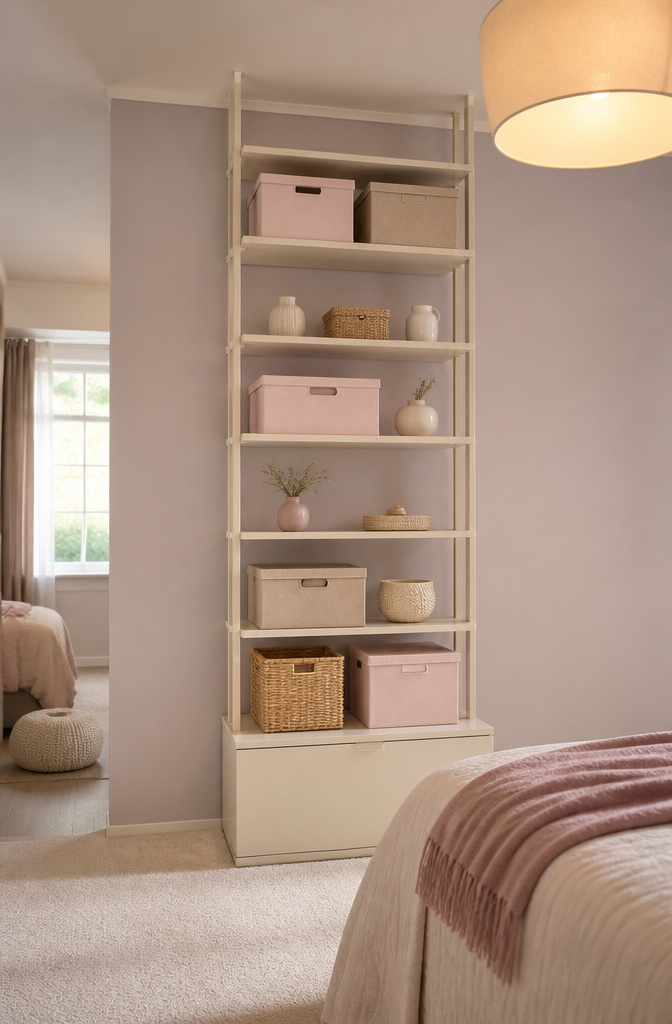
Tall shelving only earns its keep in a bedroom with 9-foot ceilings or higher. Below that, the unit starts eating the room instead of opening it up. The eyeline trick is real: a full-height shelf pulls your gaze upward and the walls feel taller, but only if the top third stays visually light. I would keep the highest shelves pale, sparse, or both; heavy color or dense packing up there collapses the effect back into clutter.
The stability question matters more than most people figure. A tall unit that is not anchored to the wall will rock, and bedroom carpet makes it worse. The break in shelving that some designers use, stepping the unit back or leaving a gap before the ceiling, adds openness but also shifts the center of gravity. If you are renting and cannot drill into studs, a freestanding piece over six feet needs a weighted base or it is a hazard, not a solution.
7. Ceiling-Mounted Nets
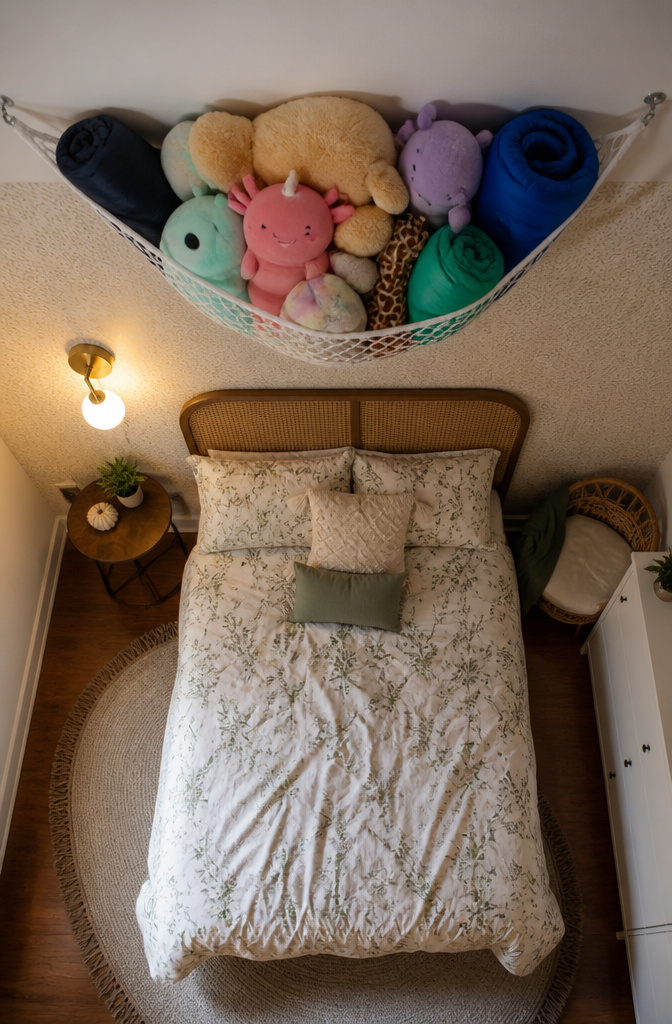
A ceiling net is basically a hammock strung flat against the drywall, and for the right pile of stuff it does a job nothing else at this price touches. I looked at these for a closet overflow project last year and the math is simple: a four-foot square of mesh costs less than a basic wall shelf and holds about the same volume as a plastic bin, just oriented upward instead of sideways. The weight limit tops out around twenty pounds, which rules out books or a winter comforter but leaves stuffed animals, offseason sandals, or a rolled sleeping bag fair game.
The sag is what you have to plan for. Even light loads pull the center down over months, and a net that starts eight inches below the ceiling can droop to eighteen unless you cinch the corners tight and check them twice a year. Installation is three or four hooks into a joist, no bracket assembly, which makes this renter-friendly if your lease allows ceiling holes at all.
What kept me from pulling the trigger was the look. Left open, a net reads dorm room or kids’ corner no matter how tidy the contents. Some people run a fabric skirt or mount the net inside a shallow ceiling-hung frame to contain the visual clutter. That second step adds cost and time, and at that point a shallow rack starts to make more sense.
Why Ceiling Storage Works
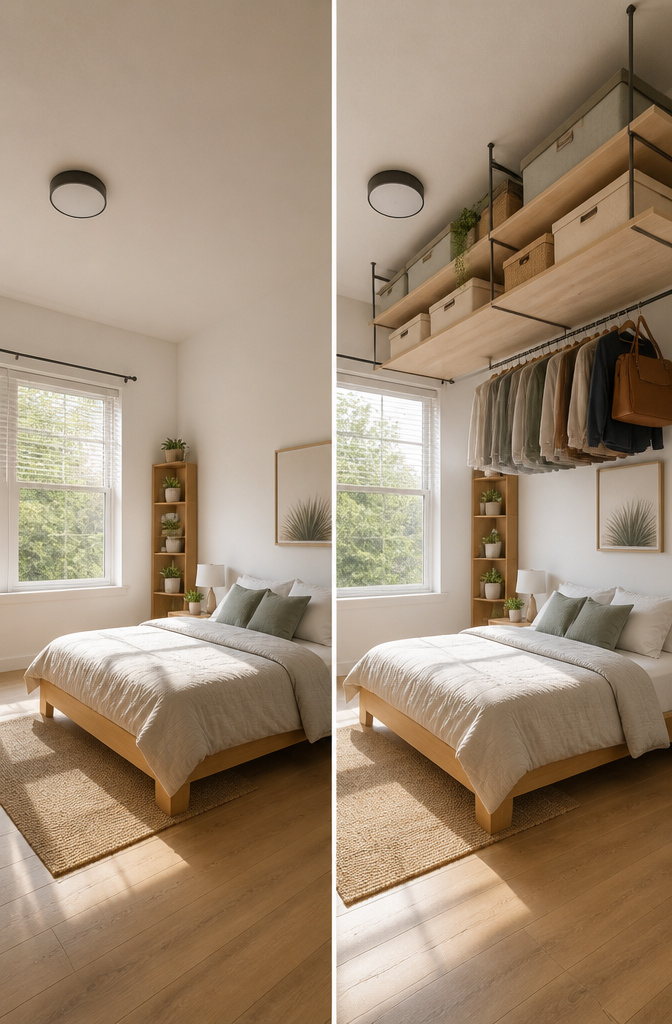
The ceiling is the one surface in a bedroom that almost nobody thinks to use, and that is exactly why it works. Floor space is what you notice first, so every basket, bin, and bookcase you add shrinks the room visually even when it keeps things tidy. Wall-to-wall shelving solves the clutter problem but creates another one: a tall unit draws the eye upward and makes the walls feel closer together. Ceiling storage sits above the sight line, so the floor stays open and the walls stay bare.
Vertical storage in general buys back square footage without the footprint of a dresser or armoire. What ceiling solutions do better is keep that vertical storage out of your peripheral vision. A rail or shelf mounted just below the ceiling does not read as "storage" the way a six-foot bookcase does; it reads as architecture, or nothing at all. The stuff you need stays accessible, but it stops competing for attention with the bed, the window, or the two feet of walking space you have left.
The catch is that this only holds if you actually commit to the height. A shelf mounted at eye level because you were worried about reachability becomes the worst of both worlds: visible clutter that still eats wall space. Ceiling storage works when it is high enough to disappear.
Matching Storage to Your Room
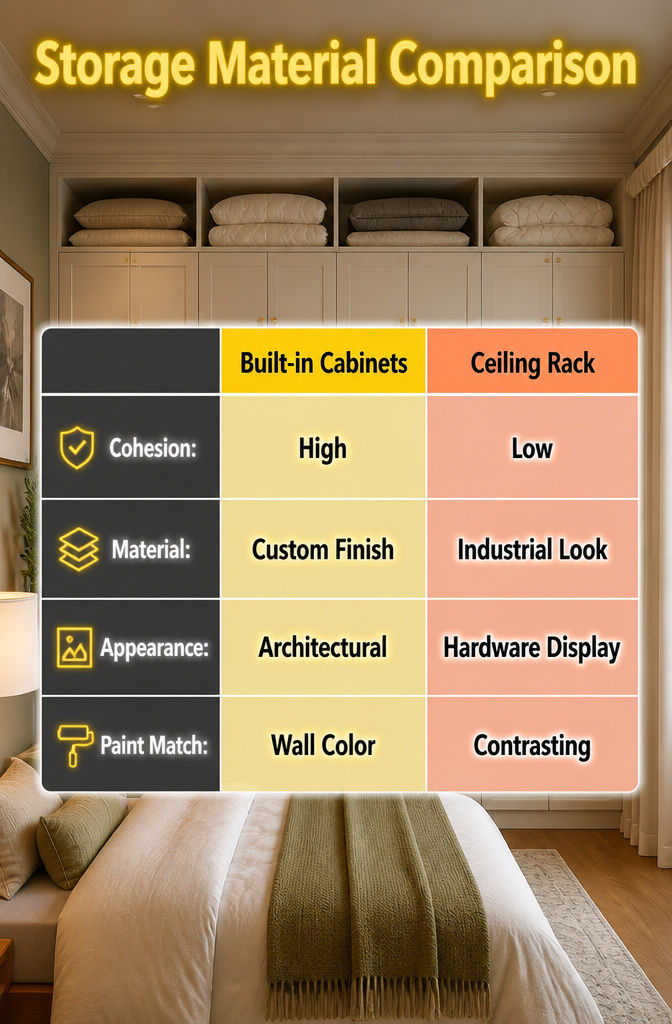
A ceiling rack that holds all your winter bedding but looks like a hardware store display is worse than no rack at all. The eye travels upward in a bedroom, especially in the first seconds after waking, so the material of your overhead storage should talk to the rest of the room rather than announce itself as a solution.
Built-in cabinets that run to the ceiling solve this by becoming architecture instead of furniture. The same paint on the cabinet face as on the wall lets the storage read as depth rather than bulk. I have seen rentals where someone painted an IKEA PAX system the wall color and trimmed it with stock molding; the result looked intentional enough that visitors assumed it came with the place.
The mistake is choosing a finish because it is durable or cheap and ignoring what sits three feet below it. Black pipe shelving reads industrial against warm oak floors. White wire shelving can look clinical above a upholstered headboard. Matching does not mean custom; it means walking a paint chip to the lumber aisle or choosing a rack powder-coated in a tone already present in the room. Utility wins the moment you need the storage, but cohesion wins every moment after that.
Installing So It Stays Put
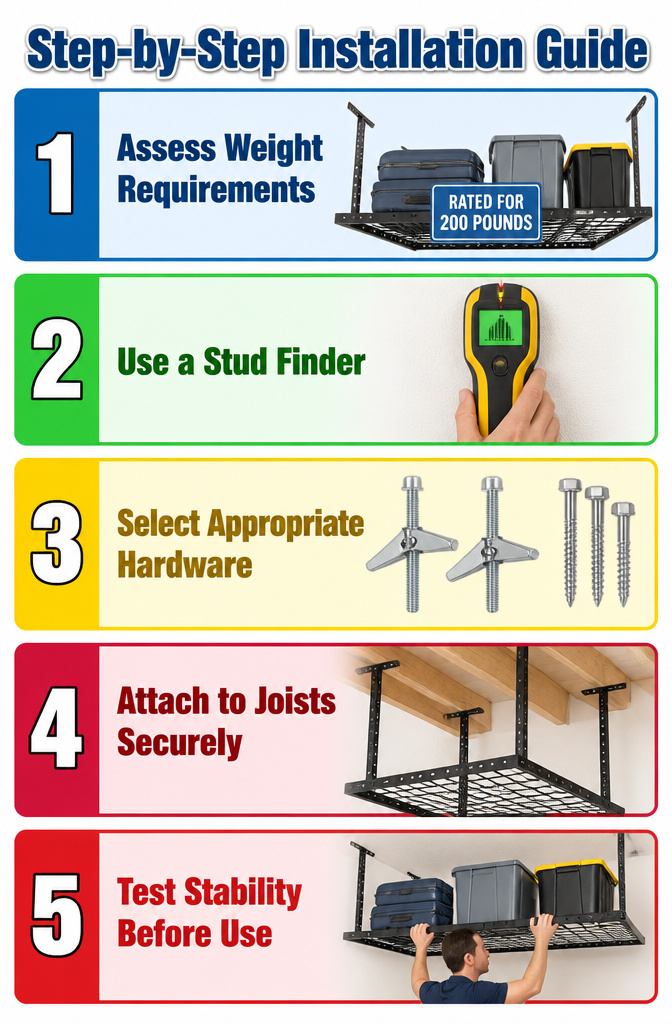
A ceiling rack rated for two hundred pounds looks reassuring until you remember that rating is for a static load sitting perfectly still. Climbing onto the bed to wrestle a suitcase back into place adds dynamic force that can spike well past the rack’s limit, and that is when the hardware fails.
Drywall anchors spread the load across a wider patch of gypsum, but they still grip nothing solid. For anything heavier than a light net of linens, you need to hit the joist or use toggle bolts that open behind the drywall and bear against the back face. I spent an evening reading installation forums where the same failure came up again and again: a four-point rack where only two bolts found wood, the other two in anchors that slowly worked loose under seasonal loading and unloading. The rack did not fall dramatically; it sagged, tilted, and dumped winter coats onto the bed at three in the morning.
The math is simple enough to do in the aisle. Add up what you actually store, not what you hope to store, then halve it for the dynamic buffer. A rack rated for one hundred fifty pounds should carry no more than seventy-five in real use, and every bolt should bite into either a joist or a properly rated toggle. The extra ten minutes with a stud finder and the right hardware is what keeps the ceiling storage where it belongs.
Frequently Asked Questions
How can I use my ceiling for storage?
Suspend items like bags, shoes, belts, and accessories from ceiling hooks or chains to keep them visible and off the floor. For heavier loads, bolt overhead racks directly into ceiling joists; a rated 600-pound rack holds seasonal bins, bikes, or ski bags. Lightweight nets work for stuffed animals, sandals, or rolled sleeping bags up to about twenty pounds.
What are some creative ceiling storage ideas for a bedroom?
Open shelves mounted tight against the ceiling create an airy gallery effect for books and spare bedding. Built-in cabinets that reach the ceiling disappear into the wall, especially when painted to match. Corner shelves cut to triangular pie shapes reclaim dead space, while ceiling nets and chain systems keep costs low and installation renter-friendly.
What should I consider when installing ceiling storage?
Always anchor into joists or use properly rated toggle bolts; drywall anchors alone will fail under load. Bedroom ceilings are framed at 16 inches on center, so garage-style racks designed for wider joist spacing need bridging planks or track adapters. Check that the bottom of any hanging item clears the tallest person’s eye level, and test the swing path before loading to avoid midnight collisions.